
Over 200,000 Laser sailboats have been built over the last 40 years, more than most other small dinghy sailboats. In this article we are going to answer some of the common questions we receive about the basics of Laser sailboat rigging, how to tell what size rig you have, what you can upgrade, and more. This information is designed for the recreational sailor who is simply looking to replace missing parts or install simple upgrades that make it easier to enjoy their boat.
As a note, we're going to make frequent reference to a rigging manual put together by Vanguard Sailboats about 10 years ago. We still refer to this guide often as it shows two different styles of rigging side by side, which is particularly helpful if you have an older boat you wish to upgrade.
You can view that rigging guide here: Laser Rigging Guide (opens in new tab)
What size rig do I have? Standard vs. Radial vs 4.7 Explained
The Laser sailboat has had a number of different rig sizes, with the intention of making the boat sailable by a wide range of sailors (and different sailor weights) by simply swapping out the lower mast section and sail while keeping all other components the same. There are currently three different rig sizes and they are commonly referred to as 'Standard', 'Radial' and '4.7'. Below you will find an image that shows the three rigs side by side, and in the following section we'll explain each one.

Laser Standard / MK2 / ILCA 7
This is the most common Laser rig size, and the original rig on the boat when it was designed. It features a 7.06 square meter sail (about 76 square feet). In 2018, the Laser Class approved a new 'Standard' sail, which is referred to as the 'MKII' or 'Mark 2' to distinguish it from the first version. The difference, among other things, is in the panels. The original 'Standard' sail featured horizontal cut panels. The new MkII sail has radial cut panels. There is no difference in size between these two versions, and as of 2020 all new Laser Standard sails are available in this updated cut.
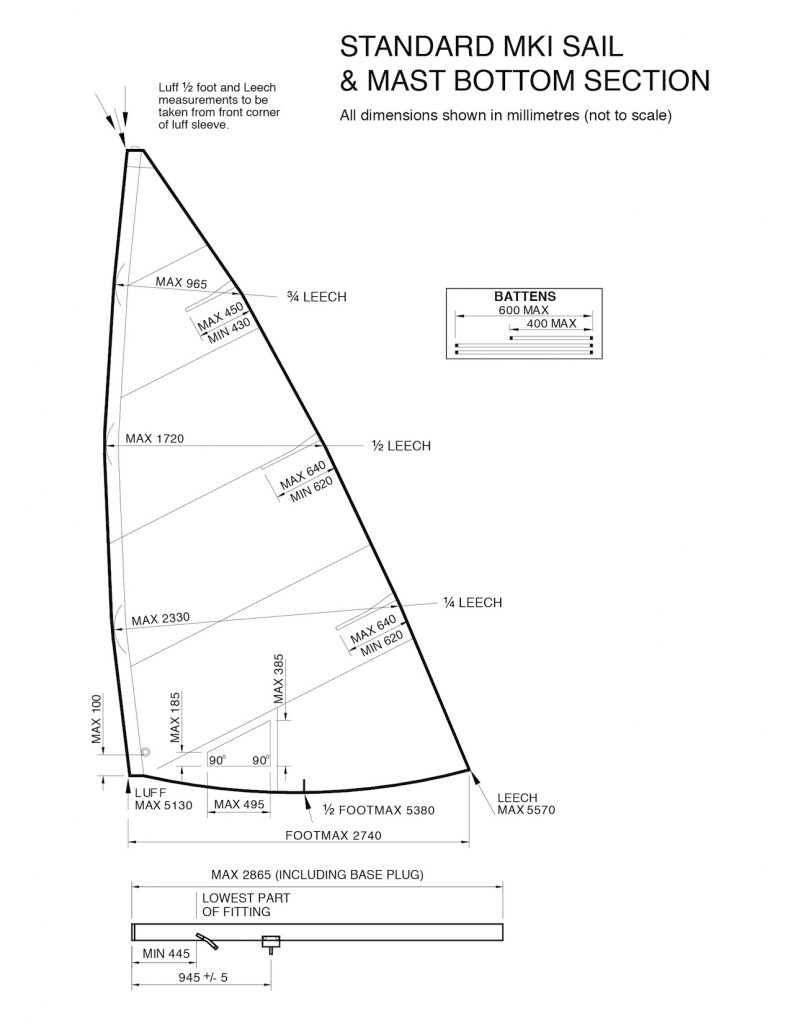
How to tell if you have a 'Standard' sail: The first and most obvious way to tell if you have a 'Standard' sail is to look at the panels. If they are horizontal, it is most likely a standard sail. Next, you can measure the luff (the front edge of the sail along the mast sleeve). This measurement should be about 5130 mm or 200 inches from the top of the sail to the bottom.
How to tell if you have a 'Standard' lower mast section: The 'Standard' lower mast section should measure about 2865 mm or 113 inches. It is a fairly stout mast section compared to the two smaller mast sections.
Laser Radial / ILCA 6
Originally called the 'M' rig when first designed, the Laser 'Radial' sail is smaller than the 'Standard' sail at 5.76 square meters (62 square feet). At the time, it was the only Laser sail to feature the radial cut panels, which allowed the sail to be de-powered more easily in bigh winds. Per the notes about the 'Standard' rig above, both the Standard and Radial sail feature the radial cut design. Another typical indicator of a Radial size sail are the blue panels at the tack and clew of the sail.
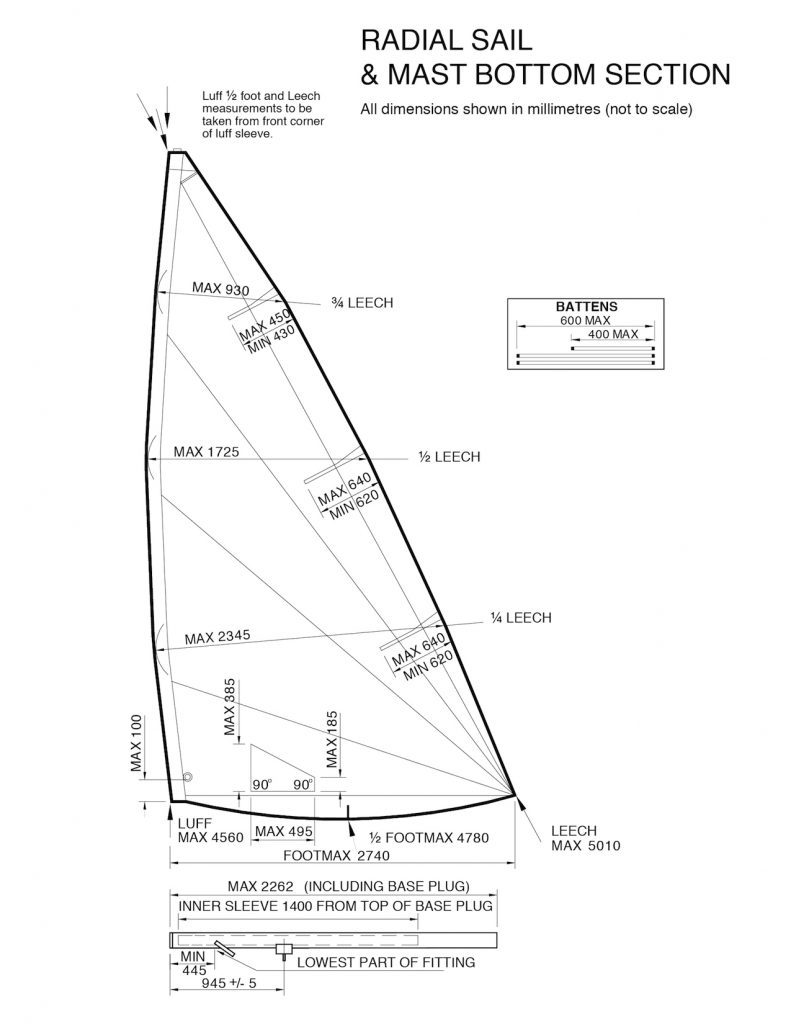
How to tell if you have a 'Radial' sail: The first and most obvious way to tell if you have a 'Standard' sail is to look at the panels. If they are radial, as in emanating out from the center, it is most likely a radial sail. Next, you can measure the luff (the front edge of the sail along the mast sleeve). This measurement should be about 4560 mm or 180 inches from the top of the sail to the bottom.
How to tell if you have a 'Radial' lower mast section: The 'Radial' lower mast section should measure about 2262 mm or 89 inches. It is also a bit smaller in diameter than the standard section.
Laser 4.7 / ILCA 5
The Laser 4.7 (or ILCA 5) is the smallest of the three Laser sails and was designed for young sailors just getting into Laser sailing. The 4.7 lower mast section is also different from the others in that is has a pre-bend near the boom fitting, allowing the sail to depower much easier. This is the least common Laser sail size, and if you have an old one around, chances are it is not a 4.7 sail.

How to tell if you have a '4.7' sail: The 4.7 is similar to the old 'Standard' sail as it has cross cut panels. Many 4.7 sails also have an obvious 4.7 logo somewhere on the cloth. Next, you can measure the luff (the front edge of the sail along the mast sleeve). This measurement should be about 4080 mm or 160 inches from the top of the sail to the bottom.
How to tell if you have a '4.7' lower mast section: The '4.7 lower mast section has a pre-bend in it and should measure about 1810 mm or 71 inches. The bend is the easiest way to tell it apart from the others.
What is the difference between 'Race' and 'Rec' rigging?
Up until about 20 years ago, the Laser featured very basic boom vang, outhaul, and cunningham controls. These were basically just long lengths of line with a series of loops and knots designed to create 'purchase' or pulling power to help tighten the controls and further shape the sail. In many ways, these rudimentary controls limited the type of sailor who really excelled in terms of performance, as you needed to be very strong and athletic to control the boat (you still do at the very top of the racing scene, particularly if you hope to compete in the Olympics). If you have a 30+ year old boat that hasn't been updated, chances are it is a 'rec' rigged boat. There is no problem sailing a Laser like this and many sailors enjoy the simplicity of the rigging and low cost of replacing line and parts.
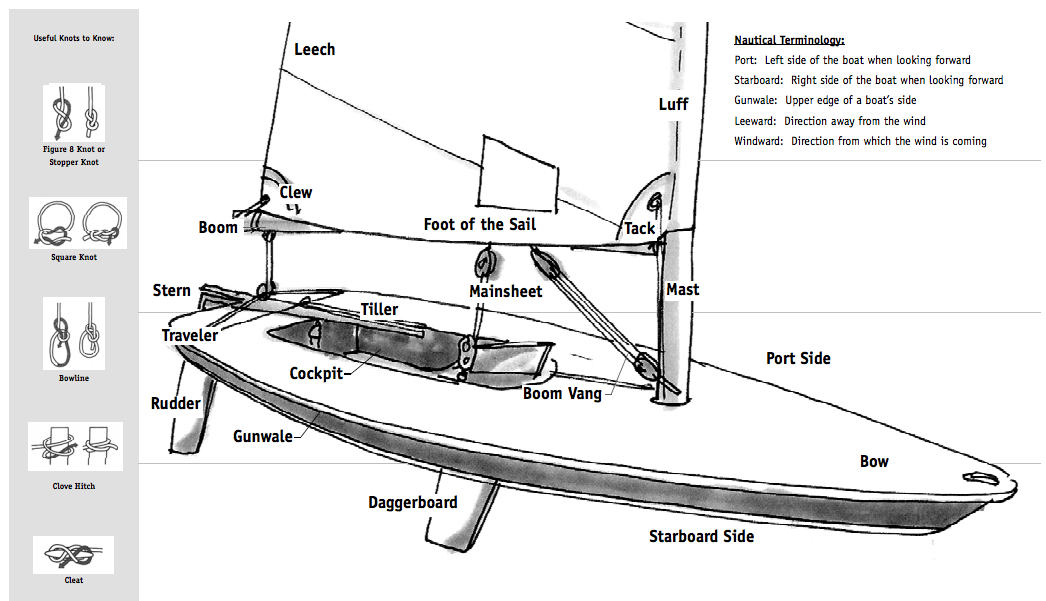
In 2000/2001, a new set of controls was approved, designed to make it easier to manipulate the sail (particularly for lighter sailors) and to rig/unrig the boat. These included a 15:1 boom vang, 8:1 cunningham, and 6:1 outhaul system. What was introduced at this time was and is still referred to as the 'Race' or 'Pro' set up, as opposed to the 'Recreational' or 'Standard' set up found before 2000. Between 2000 and 2010, many active Laser sailors upgraded their existing boats to this new standard with a series of kits (these are still available) and new boats started to include them. Starting in 2008/2009, basically every new Laser sailboat included some version of this upgraded Race rig set up. Lets take a look at how to quickly tell if your current boat is set up as a 'Race' or 'Rec' boat and then some of the differences between the two set ups.
Deck Hardware: Differences Between Race & Rec
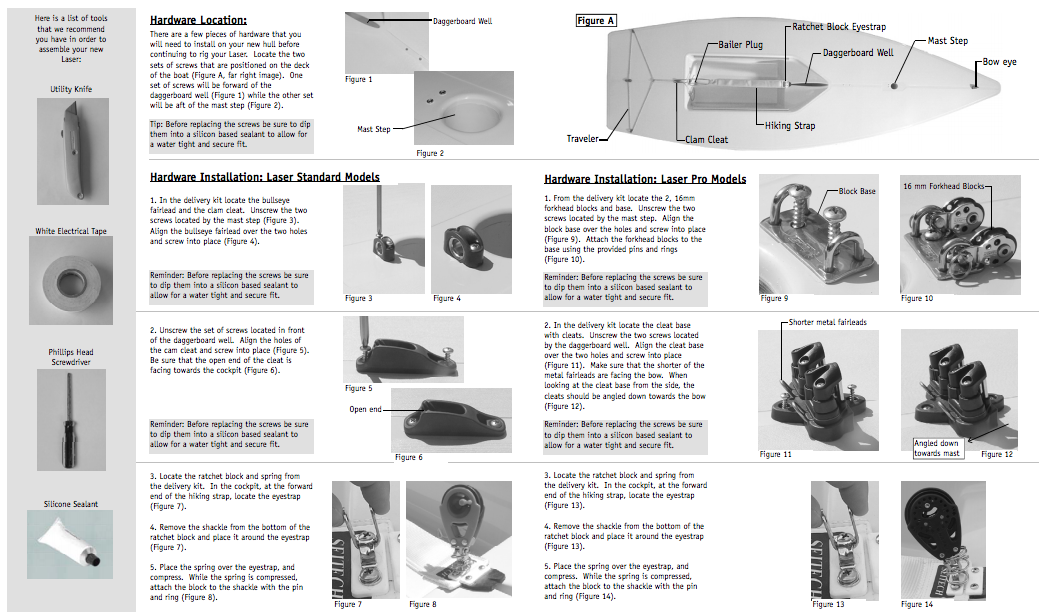
The most common question we get is how do I tell if my boat is set up with Race or Rec equipment? The quickest way to find out is to look at the hardware mounted on the deck of your Laser. Refer to the image above.
The 'Rec' setup (or 'Standard') is shown on the left, and the 'Race' set up (or 'Pro') is shown on the right. The Rec set up features a single bullseye fairlead just aft of the mast step and a single clam cleat just forward of the daggerboard trunk. These two pieces of hardware are for the cunningham control line.
The 'Race' setup (or 'Pro') is shown on the right, and features more advanced hardware. This hardware includes a deck plate with blocks just aft of the mast step (replaces the single fairlead) and a dual deck cleat in place of the single clam cleat. This new system allows both the cunningham and outhaul line to be lead down the mast and back to the cockpit for easy cleat/uncleat and adjustment from the new deck cleat system.
Insider Tip: Upgrade to 'Race' Rigging with just two kits! Back in 2000, Laser builders knew that sailors with existing boats would want a way to quickly upgrade from the 'Rec'/'Standard' rigging to the upgraded 'Race' rigging. For this reason, we still offer two kits just for this purpose.
- Laser Outhaul / Cunningham Upgrade - This kit includes everything from the blocks, cleats, hardware, line, blocks and instructions to fully update an older Laser to the latest outhaul and cunningham controls. This is the easiest way to upgrade your boat, though you will need a few basic tools to remove the old hardware from the deck and install the new components. In terms of an upgrade, this is one of THE BEST you can do to make your Laser easier to sail and to control in strong breeze.
- Laser Vang Upgrade - Upgrade to the latest 15:1 vang, no tools required! This vang system connects the same way as your old one (with a pin at the tang on the mast and with a 'key' to the fitting on the boom) and can be ready to go in minutes.
Deck Hardware: Shared Components Between Race & Rec
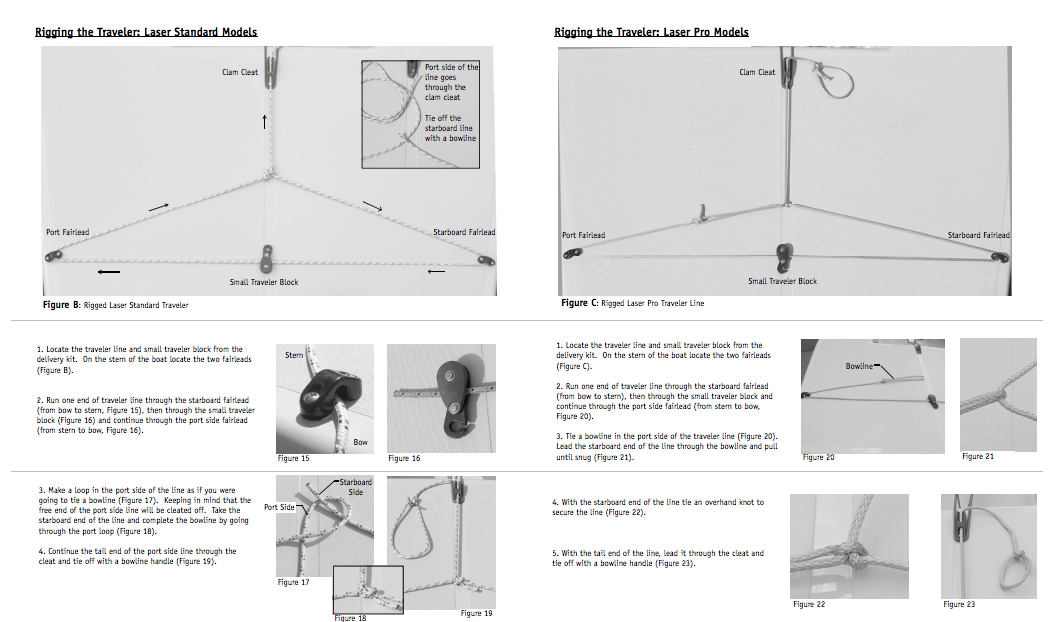
The rest of the hardware on a Laser deck is the same, regardless of what rigging specification you use. The image above shows the traveler set up, which consists of two fairleads mounted on the back corners of the boat and a single cleat mounted just aft of the cockpit on the deck. There are a few components to this area we'll mention here for your reference:
- Fairleads - Depending on the year of your Laser, you'll need either a 23mm Fairlead (found on most older boats ) or a 26mm Fairlead. We also have replica versions of both the 23mm and 26mm fairleads.
- Cleat - A single aluminum clam cleat is used for cleating the traveler. We recommend the CL221 Cleat.
- Traveler - We recommend 11 feet of a low stretch line. You can also purchase our premium Vectran Traveler with has a nicely spliced eye on one end.
Mainsheet System & Blocks
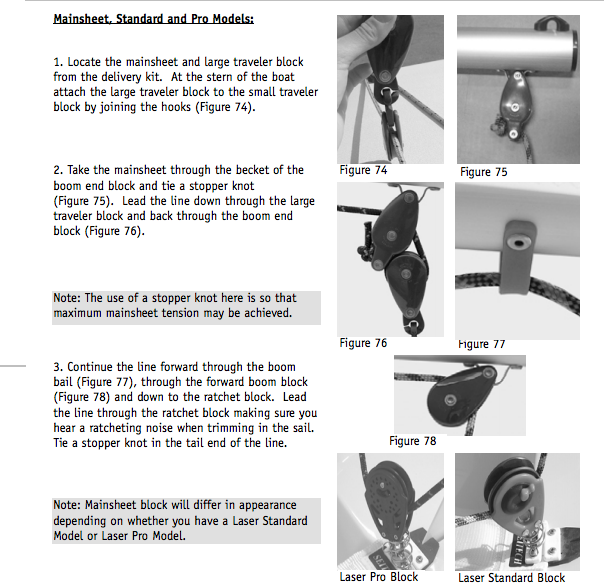
Regardless of specific rig set up, the Laser mainsheet is rigged the exact same way. The mainsheet system includes a ratchet block attached to the deck just forward of the cockpit, two blocks mounted on the boom, and a set of traveler blocks at the rear on the deck. There are a few different components and some upgrades we'll reference here.
- Mainsheet Ratchet Block - You can use any ratchet block here that is designed for a 6-8 mm line (the desired range of diameter for a Laser mainsheet). We recommend:
- Eyestrap (Stainless)
Boom Vang: 15:1 Race Vang vs 3:1 Rec Vang

The Laser boom vang is a series of blocks and line that connect to the boom with a key style fitting for quick removal and to a tang fitting with a pin at the base of the mast just above the deck line.
- Rec Vang (3:1) - Sometimes called the classic vang, this is a simple '3:1' purchase vang system with two blocks and a length of line. Here are the components.
- Classic Vang Block Upper
- Classic Vang Block Lower
- Classic Vang Assembly
- Classic Vang Line
- Race Vang (15:1) - Sometimes called the pro vang, this is a more powerful '15:1' purchase vang system with more turning points. It uses both a covered control line and pure dyneema/spectra line for strength. This is available as a full upgrade kit in a few different versions for easy install to your Laser. It is easier to install than the Outhaul/Cunningham kit as there are is no deck hardware to install - simply clip in the same way as your old vang.
- Harken Laser Vang Upgrade
- Vang Becket Block - Used at the top of the Harken Vang assembly
- Practice Vang Upgrade (Generic)
- Shared Components - There are a few pieces of hardware used on the boat regardless of what vang you have.
- Laser Vang Tang - Attached to lower mast section for connecting lower part of vang to mast
- Laser Vang Strap - Attached to boom for connecting top part of vang to mast with the key fitting via the slot
Outhaul Control System

The outhaul controls the back corner, or the clew, of the sail. The 'rec' / classic rigging is quite simple, whereas the 'race' rigging adds more power to the sail control, making it easier to adjust and flatten the sail to depower in heavy wind.
- Rec Outhaul - Uses a 10 foot length of line and the clam cleat on the boom to achieve a basic purchase system for tightening the sail. The entire control exists right on the boom.
- Race Outhaul - The upgraded race outhaul system has a few variants, but adds twice as many turning points for a more power purchase system. It uses two sections of line, a primary dyneema or spectra line in the rear and a secondary covered line in the front, which is lead down to the deck cleat for easy adjustment.
- Harken Outhaul/Cunningham Kit - Includes everything, down to the deck hardware, for adding the upgraded Outhual and Cunningham set up to your existing Laser.
- Practice Outhaul/Cunningham Kit - A less expensive alternative to the Harken kit from Allen.
Cunningham (Downhaul) Control System
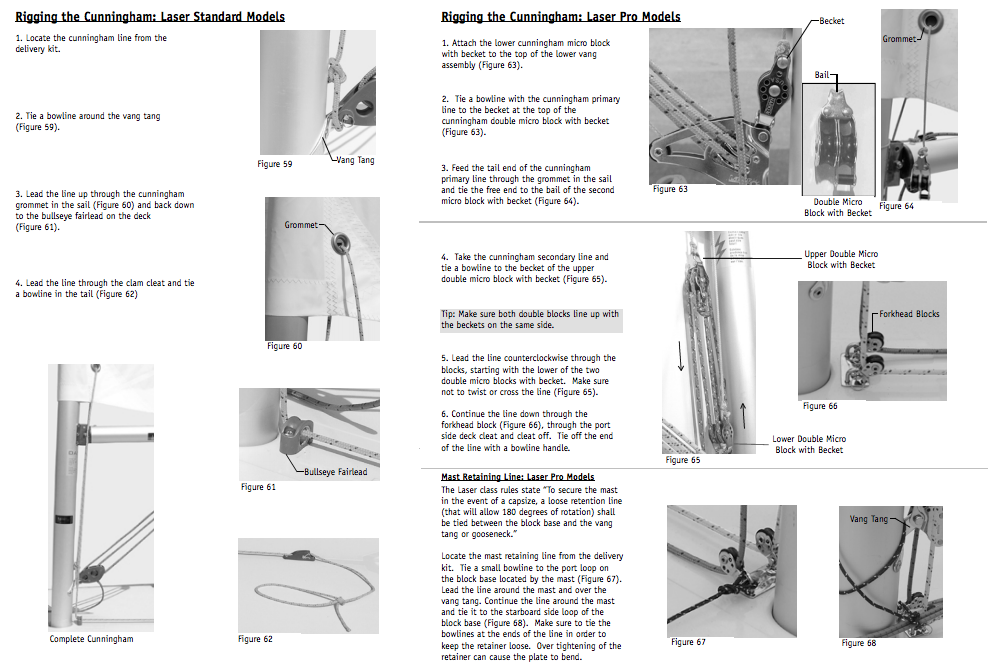
The cunningham, sometimes called the downhaul, controls the front edge of the sail The 'rec' / classic rigging is quite simple, whereas the 'race' rigging adds more power to the sail control, making it easier to adjust and flatten the sail to depower in heavy wind.
- Rec Outhaul - Uses a 10 foot length of line and the single clam cleat on the deck. The line is tied around the vang tang, up through the tack grommet, down to the fairlead, and back to the clam cleat for adjustment.
- Race Outhaul - The upgraded race cunningham system also has a few variants, but creates a powerful 8:1 purchase system. It uses two sections of line, a primary dyneema or spectra line to pass through the tack grommet and a coverer secondary line which is fed through the blocks and lead down to the deck cleat for easy adjustment.
- Harken Outhaul/Cunningham Kit - Includes everything, down to the deck hardware, for adding the upgraded Outhual and Cunningham set up to your existing Laser.
- Practice Outhaul/Cunningham Kit - A less expensive alternative to the Harken kit from Allen.
