LASER/ILCA TIPS: How to Replace and Install the Autobailer
Whether you’re installing an autobailer for the first time on an older Laser, or replacing one on your ILCA or Laser, this step-by-step guide we’ve created will walk you through the process.
What exactly does an autobailer do?
The autobailer is there to (you guessed it) automatically bail the water. Original Lasers simply had a hole in the back of the cockpit with a rubber stopper. To operate, you’d pull the stopper out to bail, and then replace it to keep the water from re-entering. Super basic, and not a great system.
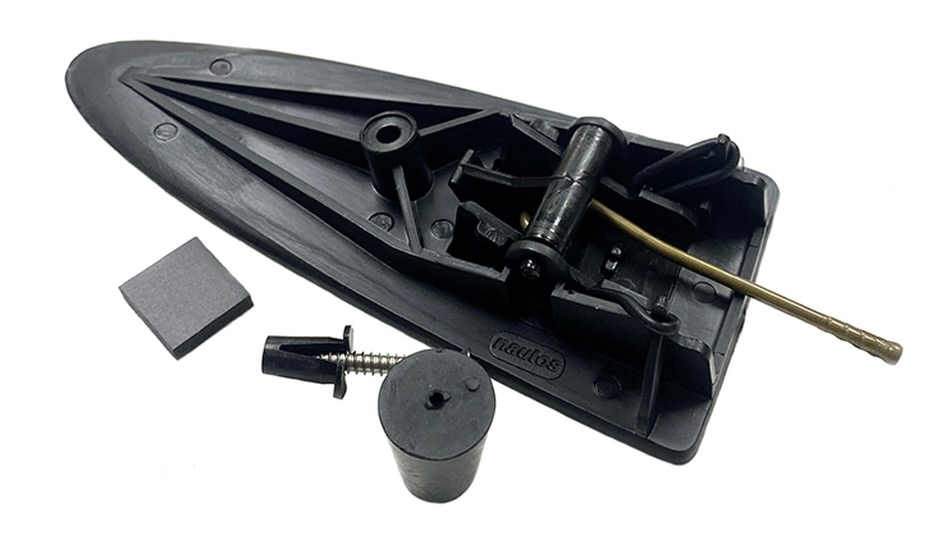
Modern Lasers / ILCAs have a black plastic autobailer fitted into the hull which is a big improvement. It functions by the Venturi effect that pulls (or suctions) water out the cockpit when the boat is in motion. This is vastly easier to operate as it is now automated. This upgrade is something all modern boats now have.
If you want to geek out about fluid dynamics and how the Venturi effect and Bernoulli's principle applies on your boat - check out this post on the Physics Stack Exchange (click here).
Steps for How to Install an ILCA / Laser Autobailer:
- Remove the old bailer: The bailer is attached to the hull by only a single screw. When you remove it, you might find it’s ‘stuck’ to the hull - this happens when iff too much silicone was used previously to ‘seal’ the bailer to the hull. So after removing the one screw you may need to tug on the bailer itself a bit. Remember to also remove the cockpit bung plug inside your boat - do this by twisting it side to side and pulling.
- Clean the area: Scrape off any left over silicone on the edges and in the screw hole. Cut away any sticky silicone or tape.
- Check the fit: The new autobailer should be flat and fit well. That said, there may be two issues:
- Sometimes a bailer can have a slight curve. So put it on the hull and make sure it sits flush. A slight indentation into the hull is better than having it protrude
- Gaps at the front edge are not ideal, the bailer should sit flush.
- One Dab Will Do: Put a ‘large pea’ sized dab of silicone on the screw hole before installing. You can also dip half of the screw threads in silicone. Don’t go crazy. This is not a case of ‘more is better’
- Install: Slip the brass bar into the hole that leads to the cockpit. Push the bailer into the hull and do a final fit check. Then tighten the screw - being mindful not to overtighten. The bailer shouldn’t move around at all. Install the cockpit bung from inside the cockpit. You can do this again by twisting it firmly.
- Check operation: When the bung is pushed in, the chute should be firmly closed. When the bung is pulled out, the chute should be fully down. Make sure it operates smoothly.
The Hull Story:
The shape of the Laser / ILCA hull has not changed - including where the autobailer fits in. That indention in the bottom is the same as it has always been, which means a new autobailer purchased this year will fit a Laser from the 1970s.
If your boat is very old, you might notice one small change has occurred. It’s not with the hull, but the bushing that connects the hull with the cockpit. In modern boats, there is a brass fitting that bridges that gap. In boats up to maybe the early 90’s, this was plastic.
We sell an Autobailer Bushing Kit, you need this if you are adding an auotbailer to an old boat that has the original black plastic bushing: ILCA/Laser Bushing Kit
What about these Bailer Springs?
For years, there were only little rubber bands inside the autobailer that pulled the chute closed. These were just o-rings, acting as springs - and would wear out after a year or so. New autobailers still have them, but there is an upgrade worth taking:
To ensure years of reliable operation, buy a bailer spring. It’s metal, will last forever and never wears out.
Shop: C-Vane Bailer Springs (click here) & Rooster Bailer Spring Plate (click here)
Final Word:
A cockpit filled with water is no fun. A low-tech method to solve this is the original bailer - your foot. Twist the inside of your foot flat along the bottom of the cockpit and KICK towards the back. You can get out 70% of the water that way. It’s annoying and distracting - but if you capsize, or go through a big wave, and the cockpit is full - KICK!
For everything else - a well functioning autobailer will be a good companion to keeping the cockpit dry without distraction so you can focus on sailing.
---
Products Mentioned:
- New Bailers:
- Repair Kit: Laser Autobailer Repair Kit (Nautos) - if you want to only replace parts and not the whole thing.
- Springs & O-Rings:
- Bungs: ILCA Autobailer Bung
- Bushing: Laser/ILCA Autobailer Bushing Kit
- Other: Silicone
Additional Resources:
Click here for Bailer Spring Install Video
Click here for our Laser/ILCA Rigging Guide
Click here for our Laser/ILCA Rigging Videos
Click here for our Laser/ILCA Reference Photos
---
This article was written by George Yioulos at West Coast Sailing.
All rights are reserved - if you want to make a link, great!
If you want to copy the content in any of our articles, please make a request to Marketing@WestCoastSailing.net
Recent Posts
-
ILCA Charter Boat Blow Out Sale
Jan 2nd 2024All charter boats have sold out. Please contact our team at boatsales@westcoastsailing.net for infor
-
2023 Year In Review
Dec 22nd 2023Another year has flown by, and we are beyond grateful to have the best customers in the world that m
-
Starting Line Sailing Supports the 2023 ICSA Singlehanded Nationals at Tulane University
Nov 15th 2023November 13th, 2023Starting Line Sailing, through it's companies Zim Sailing, West Coast Sailing, an
- Read more articles


